SyntaxHighlighter is a code syntax highlighter developed in Javascript. It can be used to highlight code snippets in your blogs to improve the readability.
This blog looks at how SyntaxHighlighter can be installed in Blogger. As per the official website, the installation instructions are as follows:
The resultant code snippet will be as shown below:
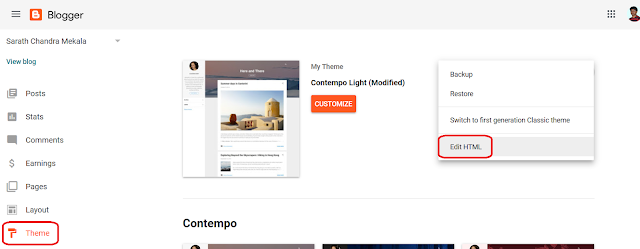
In order to add this script to your blog's template, you need to go to "Theme > Edit Html" as shown below:
Click inside the textbox that opens containing the html and do CTRL+F and search for /head.
Now copy the code snippet we have created and paste it above the </head> tag as shown below:

Once the code is copied, click on the save button at the bottom right. This will update the template.
In order to use the SyntaxHighlighter on your code snippets, you need to enclose them in <pre> tags as shown below:
It will result in below highlighted snippet:
This blog looks at how SyntaxHighlighter can be installed in Blogger. As per the official website, the installation instructions are as follows:
1. Install the base files:
    * https://alexgorbatchev.com/pub/sh/current/scripts/shCore.js
    * https://alexgorbatchev.com/pub/sh/current/styles/shCore.css

2. Install the theme
    * https://alexgorbatchev.com/pub/sh/current/styles/shThemeDefault.css

3. Install the brushes you want
    * https://alexgorbatchev.com/pub/sh/current/scripts/shBrushBash.js
    * https://alexgorbatchev.com/pub/sh/current/scripts/shBrushPlain.js
    * https://alexgorbatchev.com/pub/sh/current/scripts/shBrushPython.js

4. Invoke SyntaxHighlighter during page load and execute the following functions for blogger:
    * SyntaxHighlighter.config.bloggerMode = true;
    * SyntaxHighlighter.all();
The resultant code snippet will be as shown below:
<script src="https://alexgorbatchev.com/pub/sh/current/scripts/shCore.js" />
<link href="https://alexgorbatchev.com/pub/sh/current/styles/shCore.css" rel="stylesheet" type="text/css" />
<link href="https://alexgorbatchev.com/pub/sh/current/styles/shThemeDefault.css" rel="stylesheet" type="text/css" />
<script src="https://alexgorbatchev.com/pub/sh/current/scripts/shBrushJava.js" />
<script src="https://alexgorbatchev.com/pub/sh/current/scripts/shBrushXml.js" />
<script src="https://alexgorbatchev.com/pub/sh/current/scripts/shBrushBash.js" />
<script src="https://alexgorbatchev.com/pub/sh/current/scripts/shBrushPlain.js" />
<script src="https://alexgorbatchev.com/pub/sh/current/scripts/shBrushPython.js" />

<script language="javascript" >
    SyntaxHighlighter.config.bloggerMode = true;
    SyntaxHighlighter.all();
</script>
In order to add this script to your blog's template, you need to go to "Theme > Edit Html" as shown below:

Click inside the textbox that opens containing the html and do CTRL+F and search for /head.
Now copy the code snippet we have created and paste it above the </head> tag as shown below:

Once the code is copied, click on the save button at the bottom right. This will update the template.
In order to use the SyntaxHighlighter on your code snippets, you need to enclose them in <pre> tags as shown below:
<pre code="brush: python">
import sys
import random
import time

def add(x, y):
 return x+y
</pre>
It will result in below highlighted snippet:
import sys
import random
import time

def add(x, y):
 return x+y
Gotchas
1. When saving the template Blogger was returning a failure message but the data was getting saved properly.
2. http://alexgorbatchev.com/pub/sh/current/ is resulting in a redirect to the latest version of the library http://alexgorbatchev.com/pub/sh/3.0.83. Due to some reason the code was not working with the redirect. I had success when I used the 3.0.83 version directly to avoid redirecting.
3. Check all the links specified in the javascript. For me
http://alexgorbatchev.com/pub/sh/3.0.83/styles/shThemeDefault.css was returning a 404. So used shThemeEclipse.css instead which was reachable.
4. Dynamic Theme has a different script loading mechanism and may not support SyntaxHighlighter. You may need to do some tweaks go get it running.

The surprising observation here is that SyntaxHighlighter is getting downloaded on http while we have given a https url.
Found a message from Alex Gorbatchev explaining one possible reason for this.
A quick check with Curl throws some light on this behavior:

What we see is that the https url is getting redirected to a http site and due to this the browser is blocking the SyntaxHighlighter content.
One solution I found to this issue was to use an alternative CDN. After changes my final script looks as below:
Part-2 : Checkout part-2 for some demo snippets highlighted with SytaxHighlighter
http://alexgorbatchev.com/pub/sh/3.0.83/styles/shThemeDefault.css was returning a 404. So used shThemeEclipse.css instead which was reachable.
4. Dynamic Theme has a different script loading mechanism and may not support SyntaxHighlighter. You may need to do some tweaks go get it running.
Fixing Blocked loading mixed active content problem
All modern browsers block loading scripts from a http site when the initial request was on https. Blogger defaults to using https. When loading the SyntaxHighlither code you may see that the scripts are not getting executed on the page and when you check the webconsole (Ctrl + Shift + I) you may see that the browser is throwing errors saying its blocking loading mixed active content for SyntaxHighlither.
The surprising observation here is that SyntaxHighlighter is getting downloaded on http while we have given a https url.
Found a message from Alex Gorbatchev explaining one possible reason for this.
A quick check with Curl throws some light on this behavior:
What we see is that the https url is getting redirected to a http site and due to this the browser is blocking the SyntaxHighlighter content.
One solution I found to this issue was to use an alternative CDN. After changes my final script looks as below:
<script src="https://cdnjs.cloudflare.com/ajax/libs/SyntaxHighlighter/3.0.83/scripts/shCore.js" />
<link href="https://cdnjs.cloudflare.com/ajax/libs/SyntaxHighlighter/3.0.83/styles/shCore.css" rel="stylesheet" type="text/css" />
<link href="https://cdnjs.cloudflare.com/ajax/libs/SyntaxHighlighter/3.0.83/styles/shThemeEclipse.css" rel="stylesheet" type="text/css" />
<script src="https://cdnjs.cloudflare.com/ajax/libs/SyntaxHighlighter/3.0.83/scripts/shBrushJava.js" />
<script src="https://cdnjs.cloudflare.com/ajax/libs/SyntaxHighlighter/3.0.83/scripts/shBrushXml.js" />
<script src="https://cdnjs.cloudflare.com/ajax/libs/SyntaxHighlighter/3.0.83/scripts/shBrushBash.js" />
<script src="https://cdnjs.cloudflare.com/ajax/libs/SyntaxHighlighter/3.0.83/scripts/shBrushPlain.js" />
<script src="https://cdnjs.cloudflare.com/ajax/libs/SyntaxHighlighter/3.0.83/scripts/shBrushPython.js" />
<script language="javascript" >
    SyntaxHighlighter.config.bloggerMode = true;
    SyntaxHighlighter.all();
</script>
Part-2 : Checkout part-2 for some demo snippets highlighted with SytaxHighlighter
Comments